How to Paint Watercolor in Procreate - Herbs Series: Sage
Watercolor sage bundle
Watercolor has a special place in my heart. It led me on a quest to find the most realistic way to paint without the muss, the cups of water waiting to be knocked over, and most importantly, without the need for a table.
(Anyone else paint exclusively on their lap, curled up around the ipad? In your comfiest clothes? With snacks at hand?)
….same, same. :)
So, let’s paint some mega-real, rich textured, watercolor herbs - muss free!
For this project, I used the Everything Watercolor for Procreate brush pack from Uproot Brushes, but you can definitely use any watercolor brushes you have for a similar look! You'll just need a good brush (ideally with some natural dark edges), a smudger, and a couple brushes for adding splatters and watery effects. If you want the exact brushes, check them out here (and use my affiliate link to take 10% off with code WOOLY10 at checkout):
BRUSHES USED:
AN Glazy Daisy
AN Saturated Water Smudger
AN Salt Smudge Tool
AN Blooming Cloud
AN Wet Bleed Edge
AN Sprinkle Drops
Color palette:
I used colors from my August color palette, which I send out to my newsletter subscribers. You can get access to it (and other great freebies!) by signing up here:
Canvas texture & Set up:
To start off, I'm working in the canvas that comes with the brush pack, using the Hand Pressed Paper. You can use any paper texture you like, but I do recommend using a texture as a key element of recreating the watercolor look.
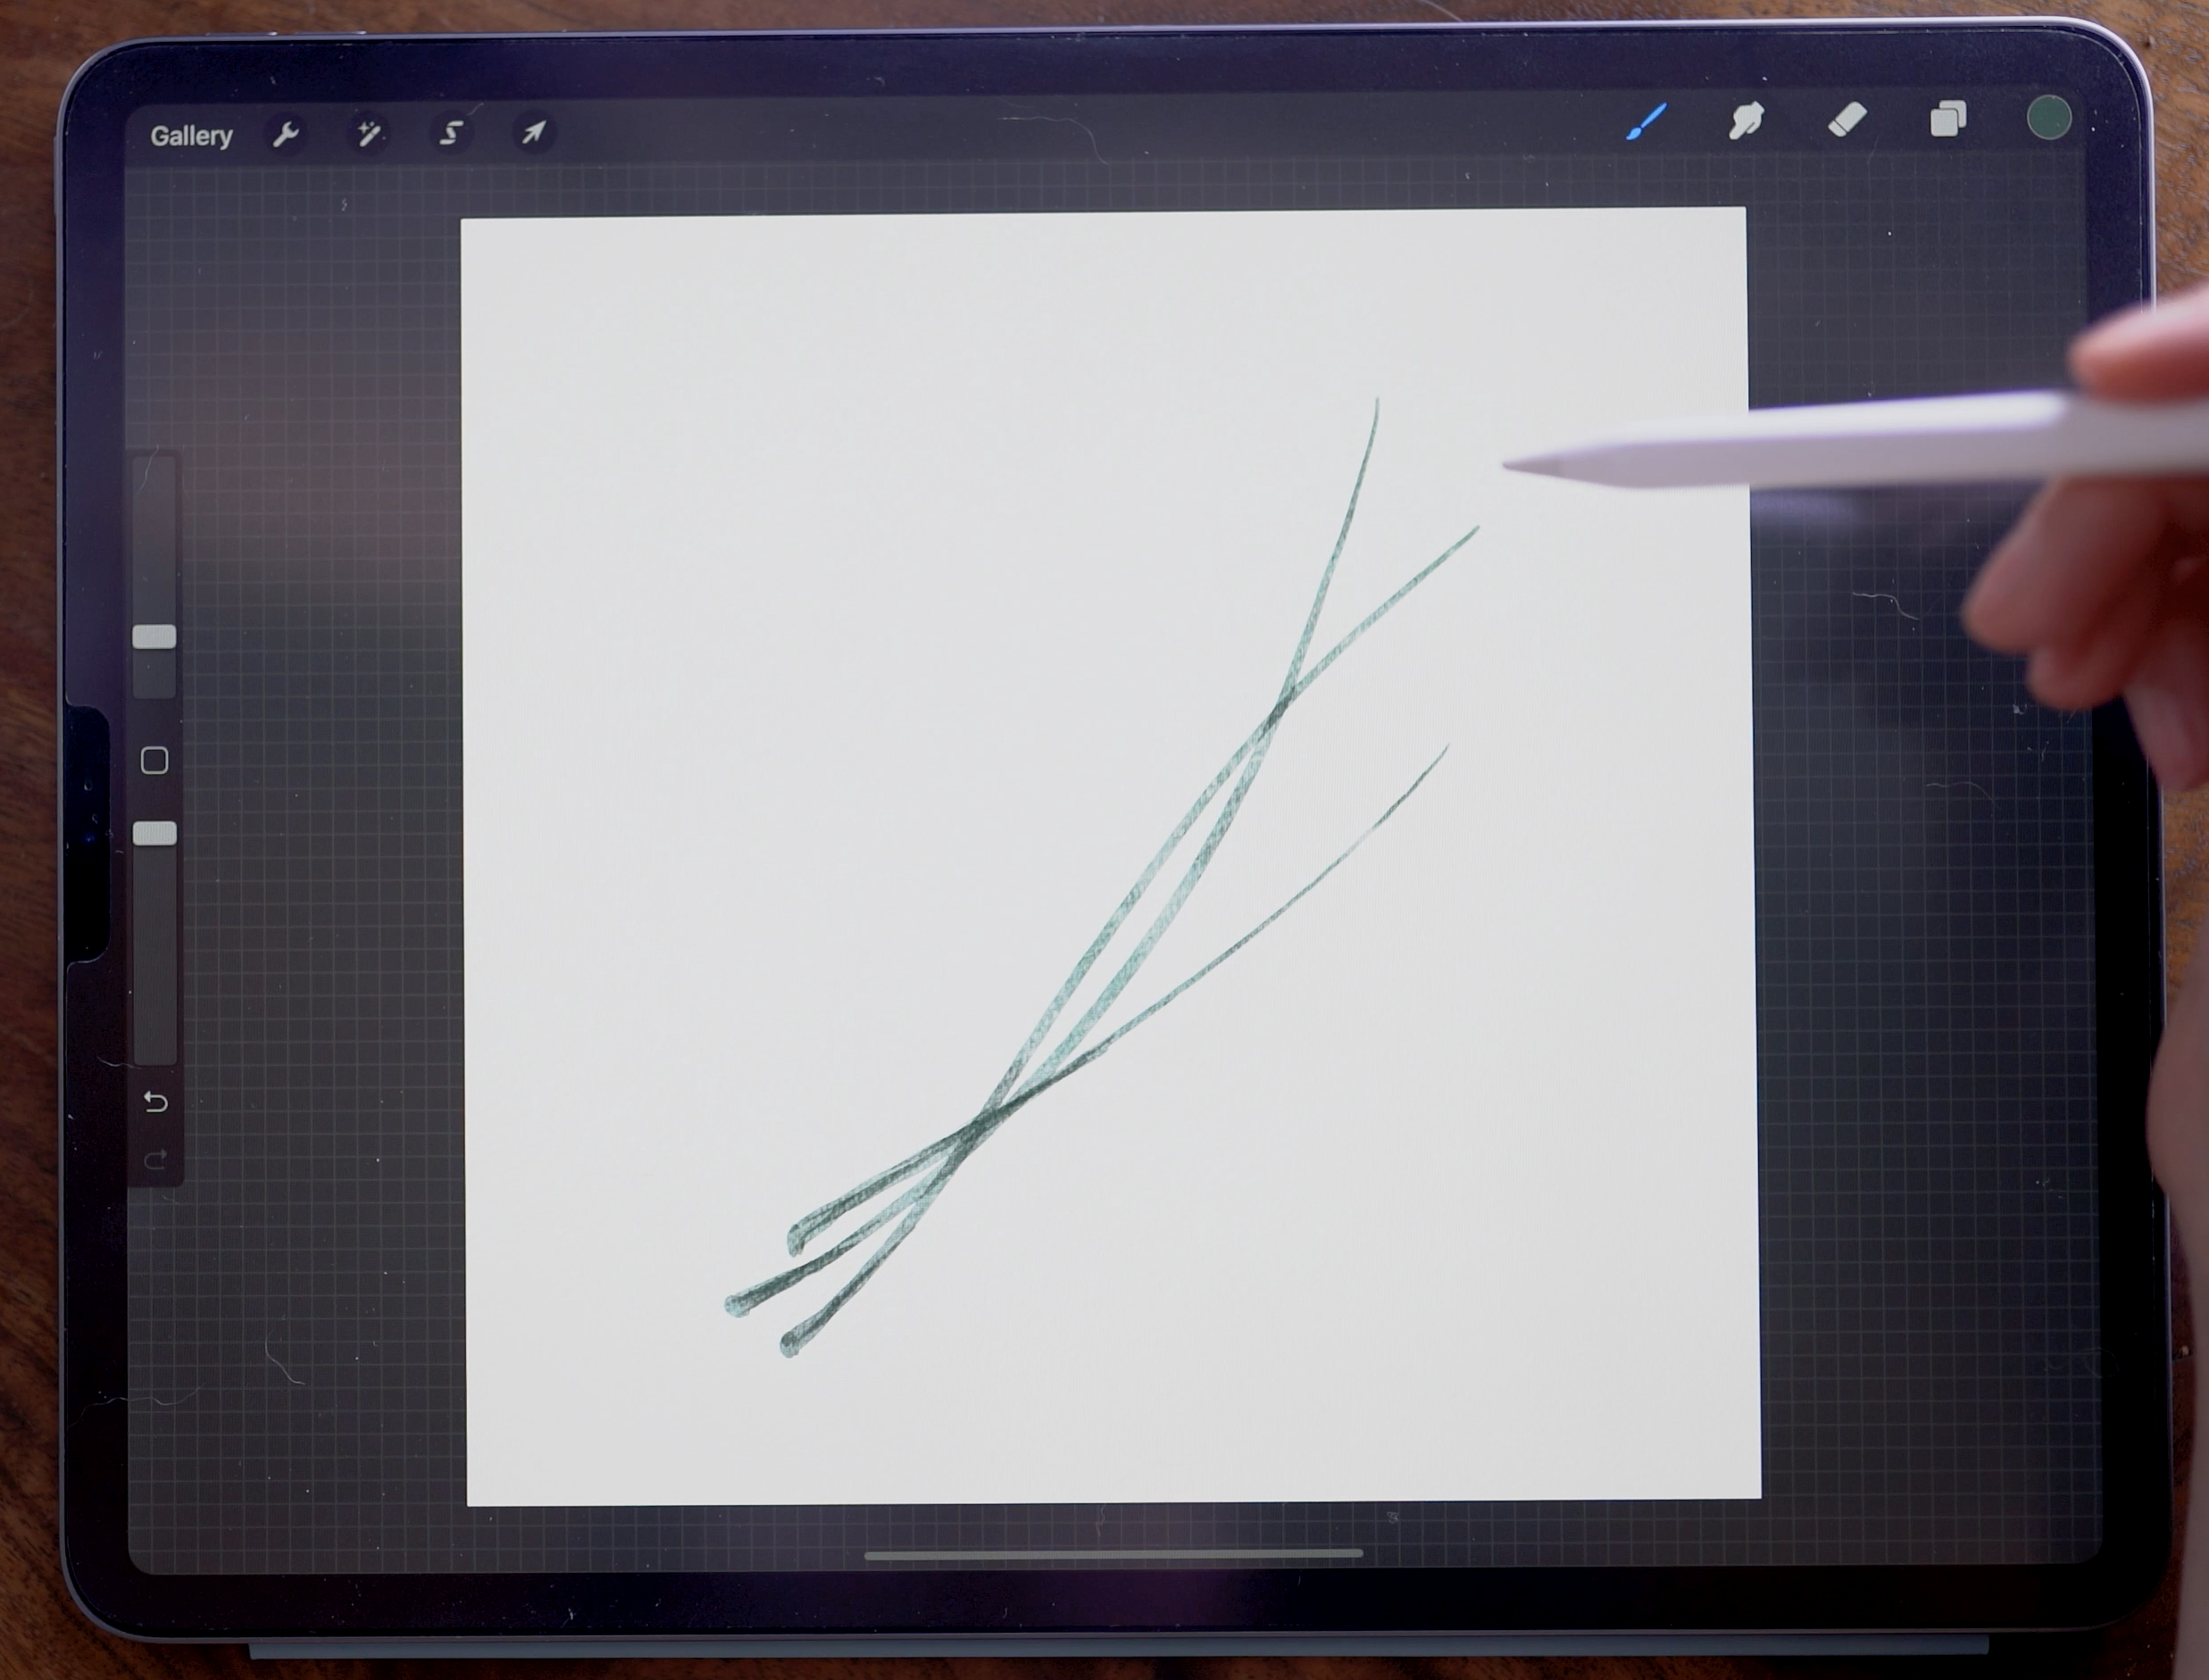
Stems
Using the Glazy Daisy brush set to about 5%, draw three stems, intersecting them towards the base. Draw them using smooth strokes, making them thicker at the bottom and tapered at the top.
Leaves
Set the Glazy Daisy brush to about 10%, and begin to draw the leaves.
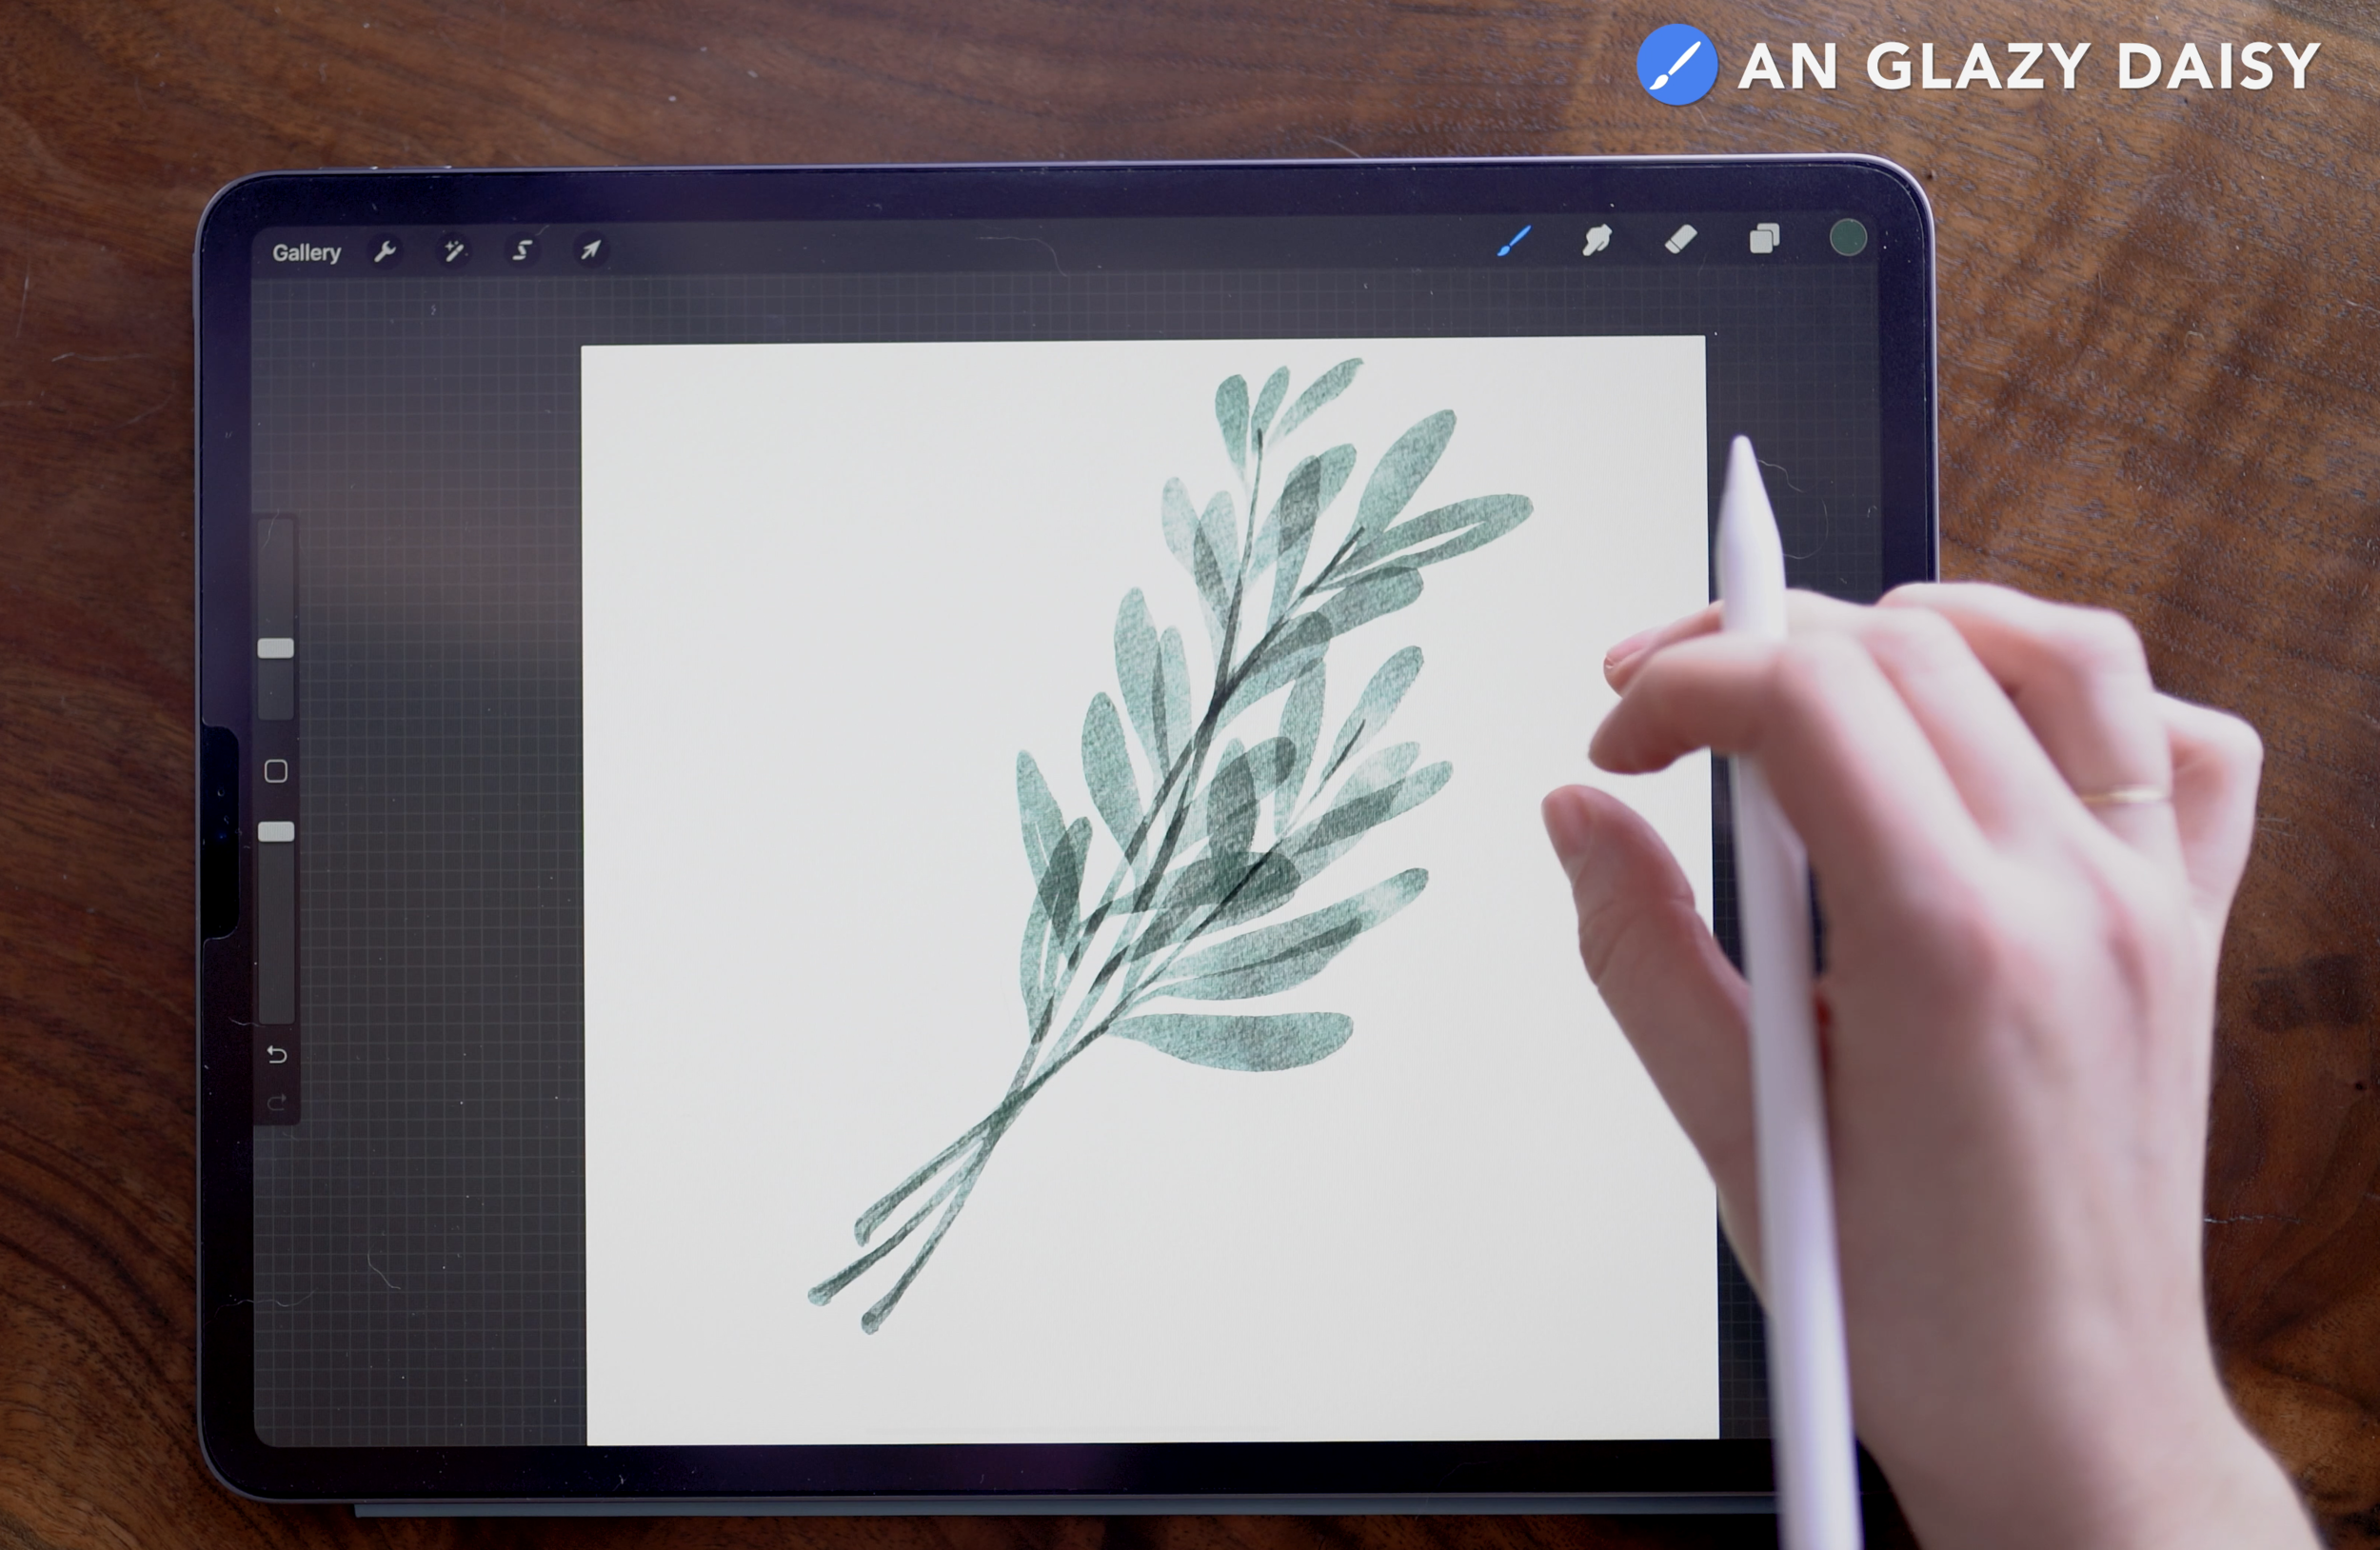
Using the brush’s hard outer edge to your advantage, try to make each leaf a single stroke, starting at the stem, and then looping back on itself to create a long, exaggerated tear-drop shape.
Layer Mask
In the layers panel, duplicate the leaves layer. If you’re working with a texture that uses different blend modes, change the duplicate layer blend mode to Normal.
Make sure the duplicate layer is below the painting layer. This is going to become the layer mask. Use two fingers to swipe right on the layer to turn Alpha Lock on, or tap to bring up the layer menu and select it from the options.
Then select a solid white, and fill the layer. With Alpha Lock on, it will only fill the areas of your painting. Duplicate the layer once more, and then merge these two white-filled layers together.
Finally, tap on this layer to bring up the side menu, and then tap “Select” to select the layer contents.

Smudging:
Make sure to move back onto the painting layer for this next step, with the mask contents still selected. Switch to the smudge tool. In the example, I’m using the Saturated Water Smudger.

Blend any overlapping areas of the leaves so they no longer look transparent. You can also use this opportunity to pull the color around, creating more variation in the pigment. You can even erase in some areas to remove the pigment, and then blend them out again.
Adding Light Details
Now move to an empty layer above the painting layer.
Change the blend mode to Add, and select a lighter green color. Use a brush that will give natural watercolor effects - in the example, I’m using the Salt Smudge tool to get these little speckles.


Once you’re happy with the amount of speckles and salt bits, reduce the layer opacity to about 50% so it is more subtle and natural looking. Stay on this layer for the next step.
More light details :)
Choose another light green, and a softer edge brush. For the example, I used the Wet Bleed Edge brush.
Add variation and lightness to some of the leaves to increase the level of contrast. Especially where leaves overlap, this can help it look like the leaves are turned, showing their underside.


Now deselect the mask layer. In the layers panel, select the layer contents of the stems layer, and use the eraser tool to lightly remove the color from any places that the stems and leaves overlap and intersect.
Merge
Now in the layers panel, pinch to merge all the painting layers together, leaving just a single empty background layer below, and the texture layers above. Tap the layer with the sage to bring up the side menu, and then tap “select” to select the contents of the layer.

Adding Dark details
Choose a darker green, and a brush that will paint darker, hard edges. In the example, I’m using the Blooming Cloud brush.

With the layer contents selected, paint in the Sage layer. This will keep your work contained within the bounds of the selection.
Paint in darker edges, outlining some of the leaves and adding some slight shading to areas of overlap.
Then deselect the layer.
Thread wrap
Use the eraser, set to about 2%, to erase several small, thin lines from the spot where the stems all overlap. This is going to be where you paint the thread wrapping.

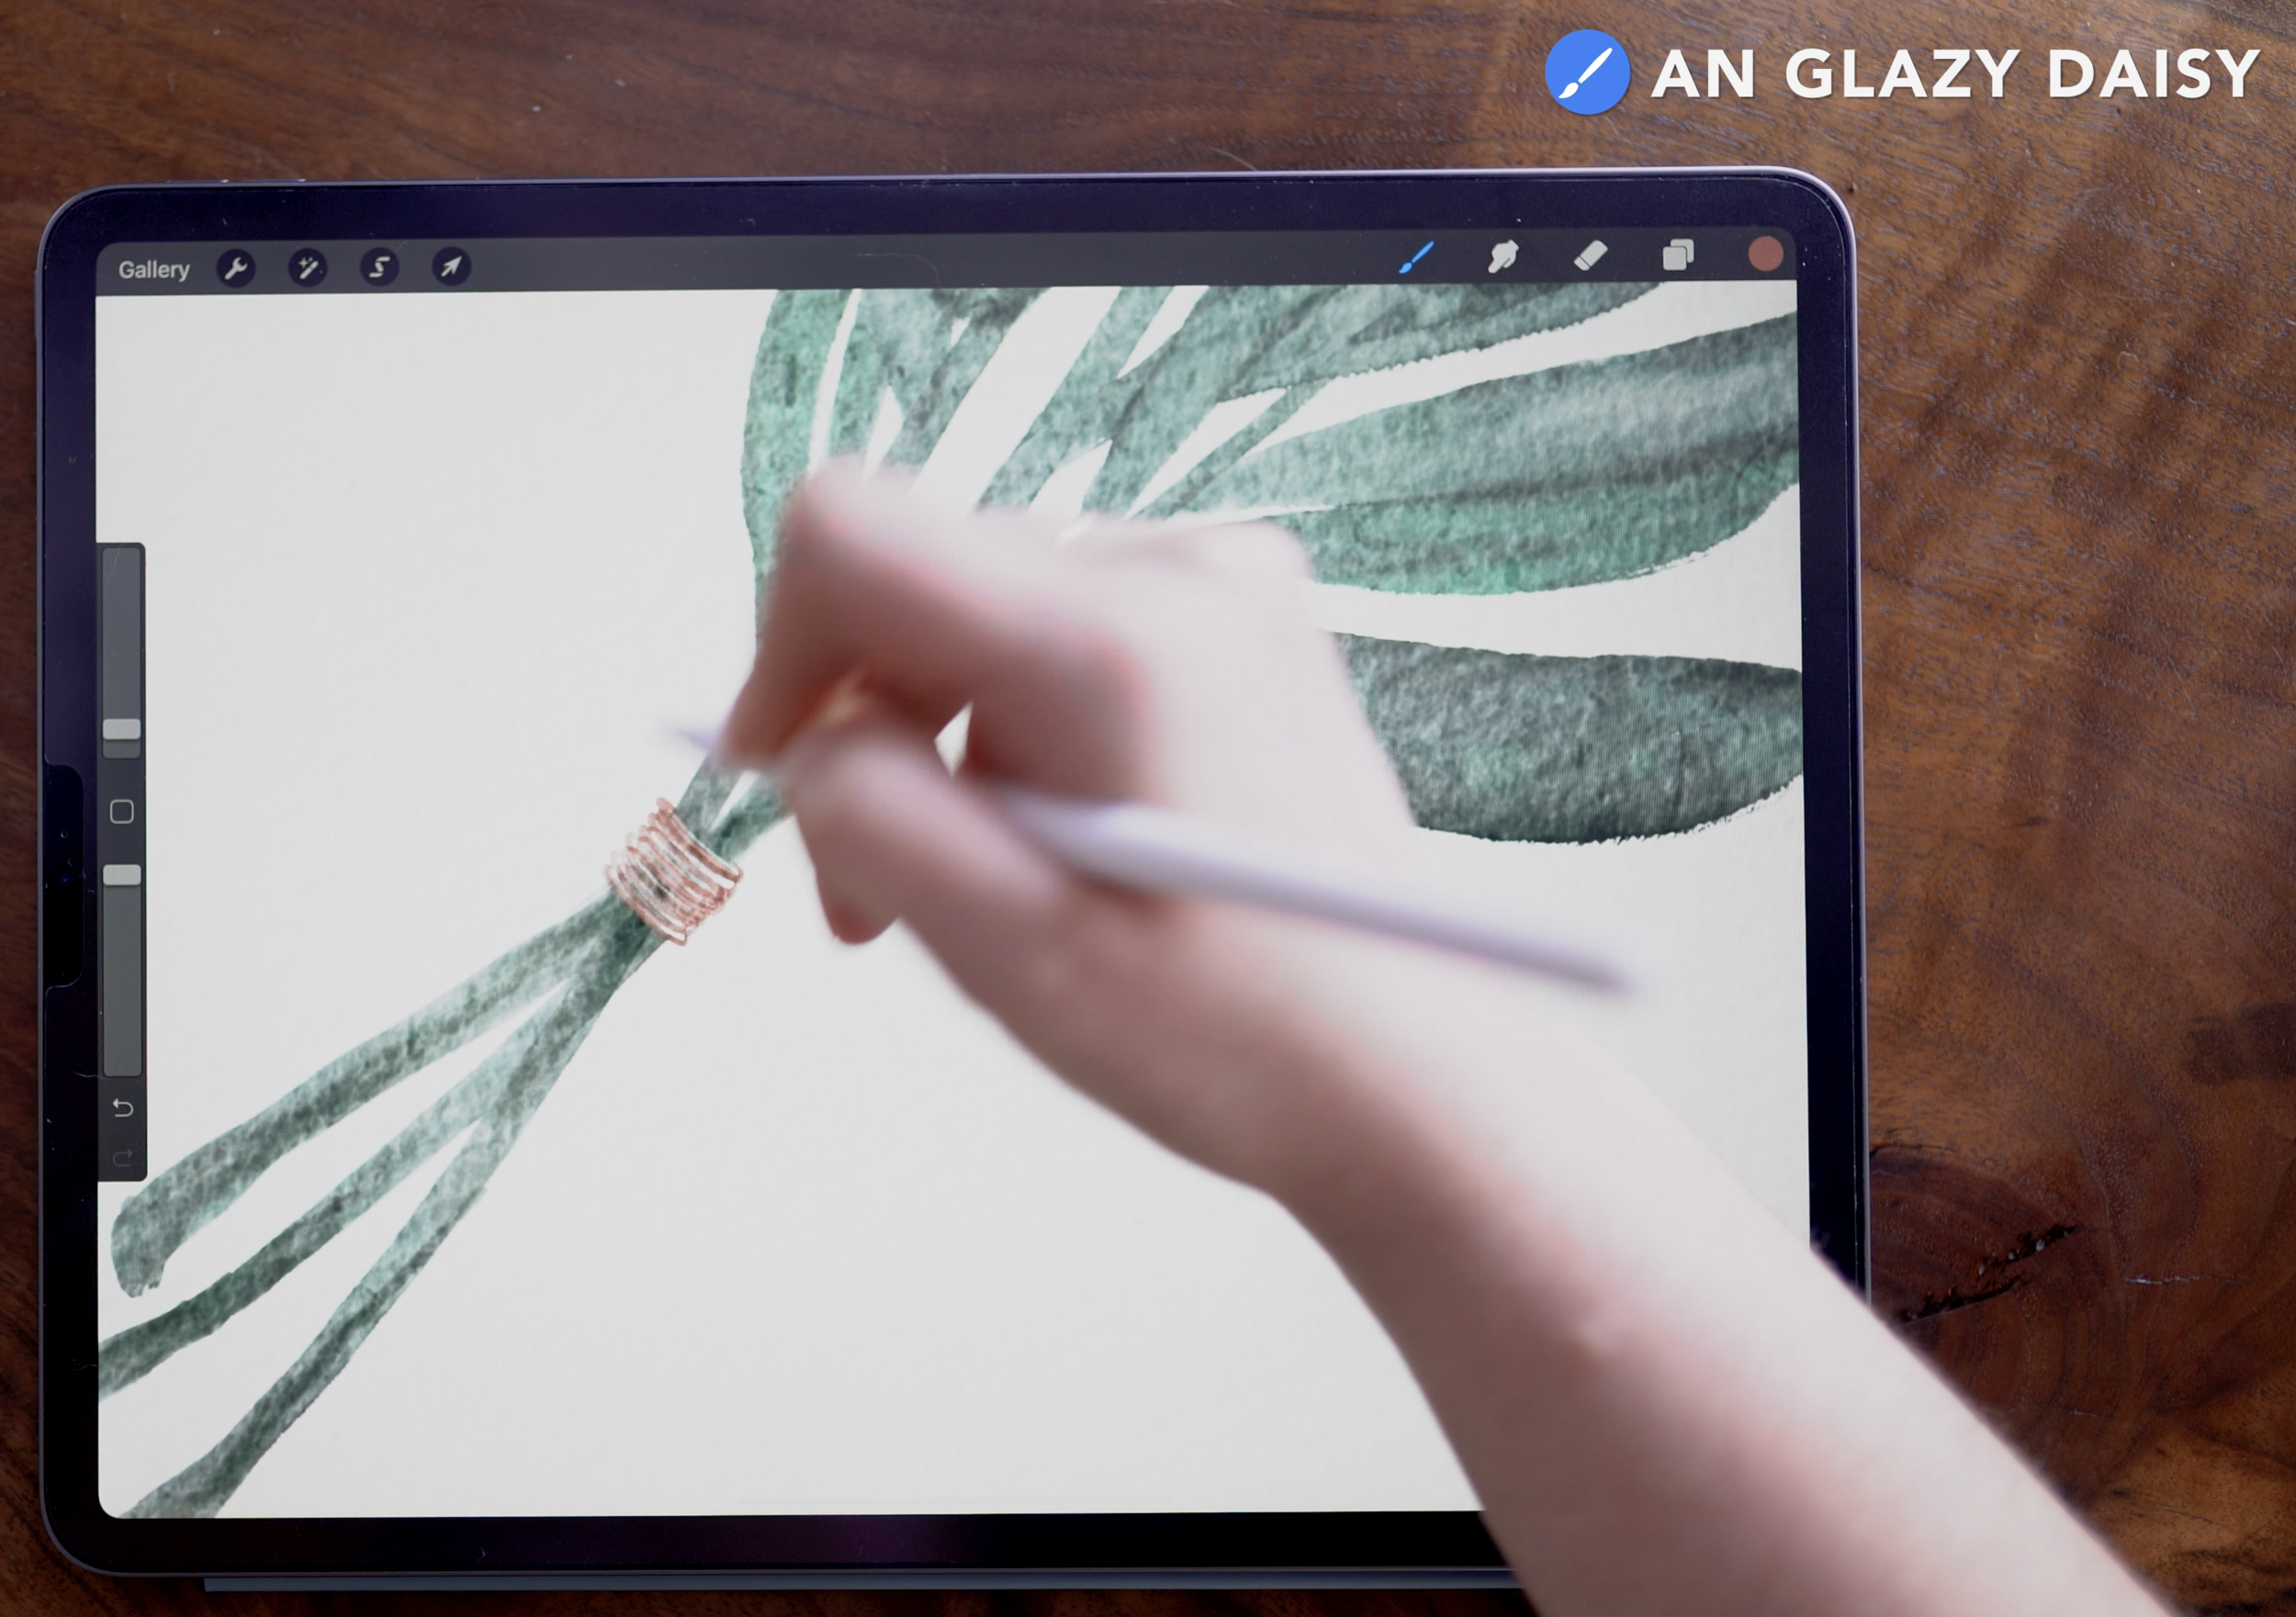
Choose a color for the thread, and select the paintbrush. Set it to 2%.
Paint the threads, using lots of layers little lines, and curving them inward at both sides - like long, extended C’s.
Background Wash
Switch to the Background layer, beneath the sage painting layer.
Using the Glazy Daisy brush (or your main paintbrush, if you’re using different brushes), set the size to 100%. Paint in a large square or rectangle behind the sage. I kept a large margin around mine, letting the sage extend beyond the background square a bit for a cool effect.
Use a splatter brush to pop in some watery effects.

Then, in the layers panel, select the layer contents of the sage layer. With this selected, move back to the background layer. Use three fingers to “scrub” the screen - this will clear the color from the selected area. What you’re doing is removing the overlap of the colors, so the sage (which is a little transparent) doesn’t have the tint of the background wash color. You might need to do this step a couple times to fully remove the overlapping color - just be sure to select on the sage layer, and remove on the background layer.
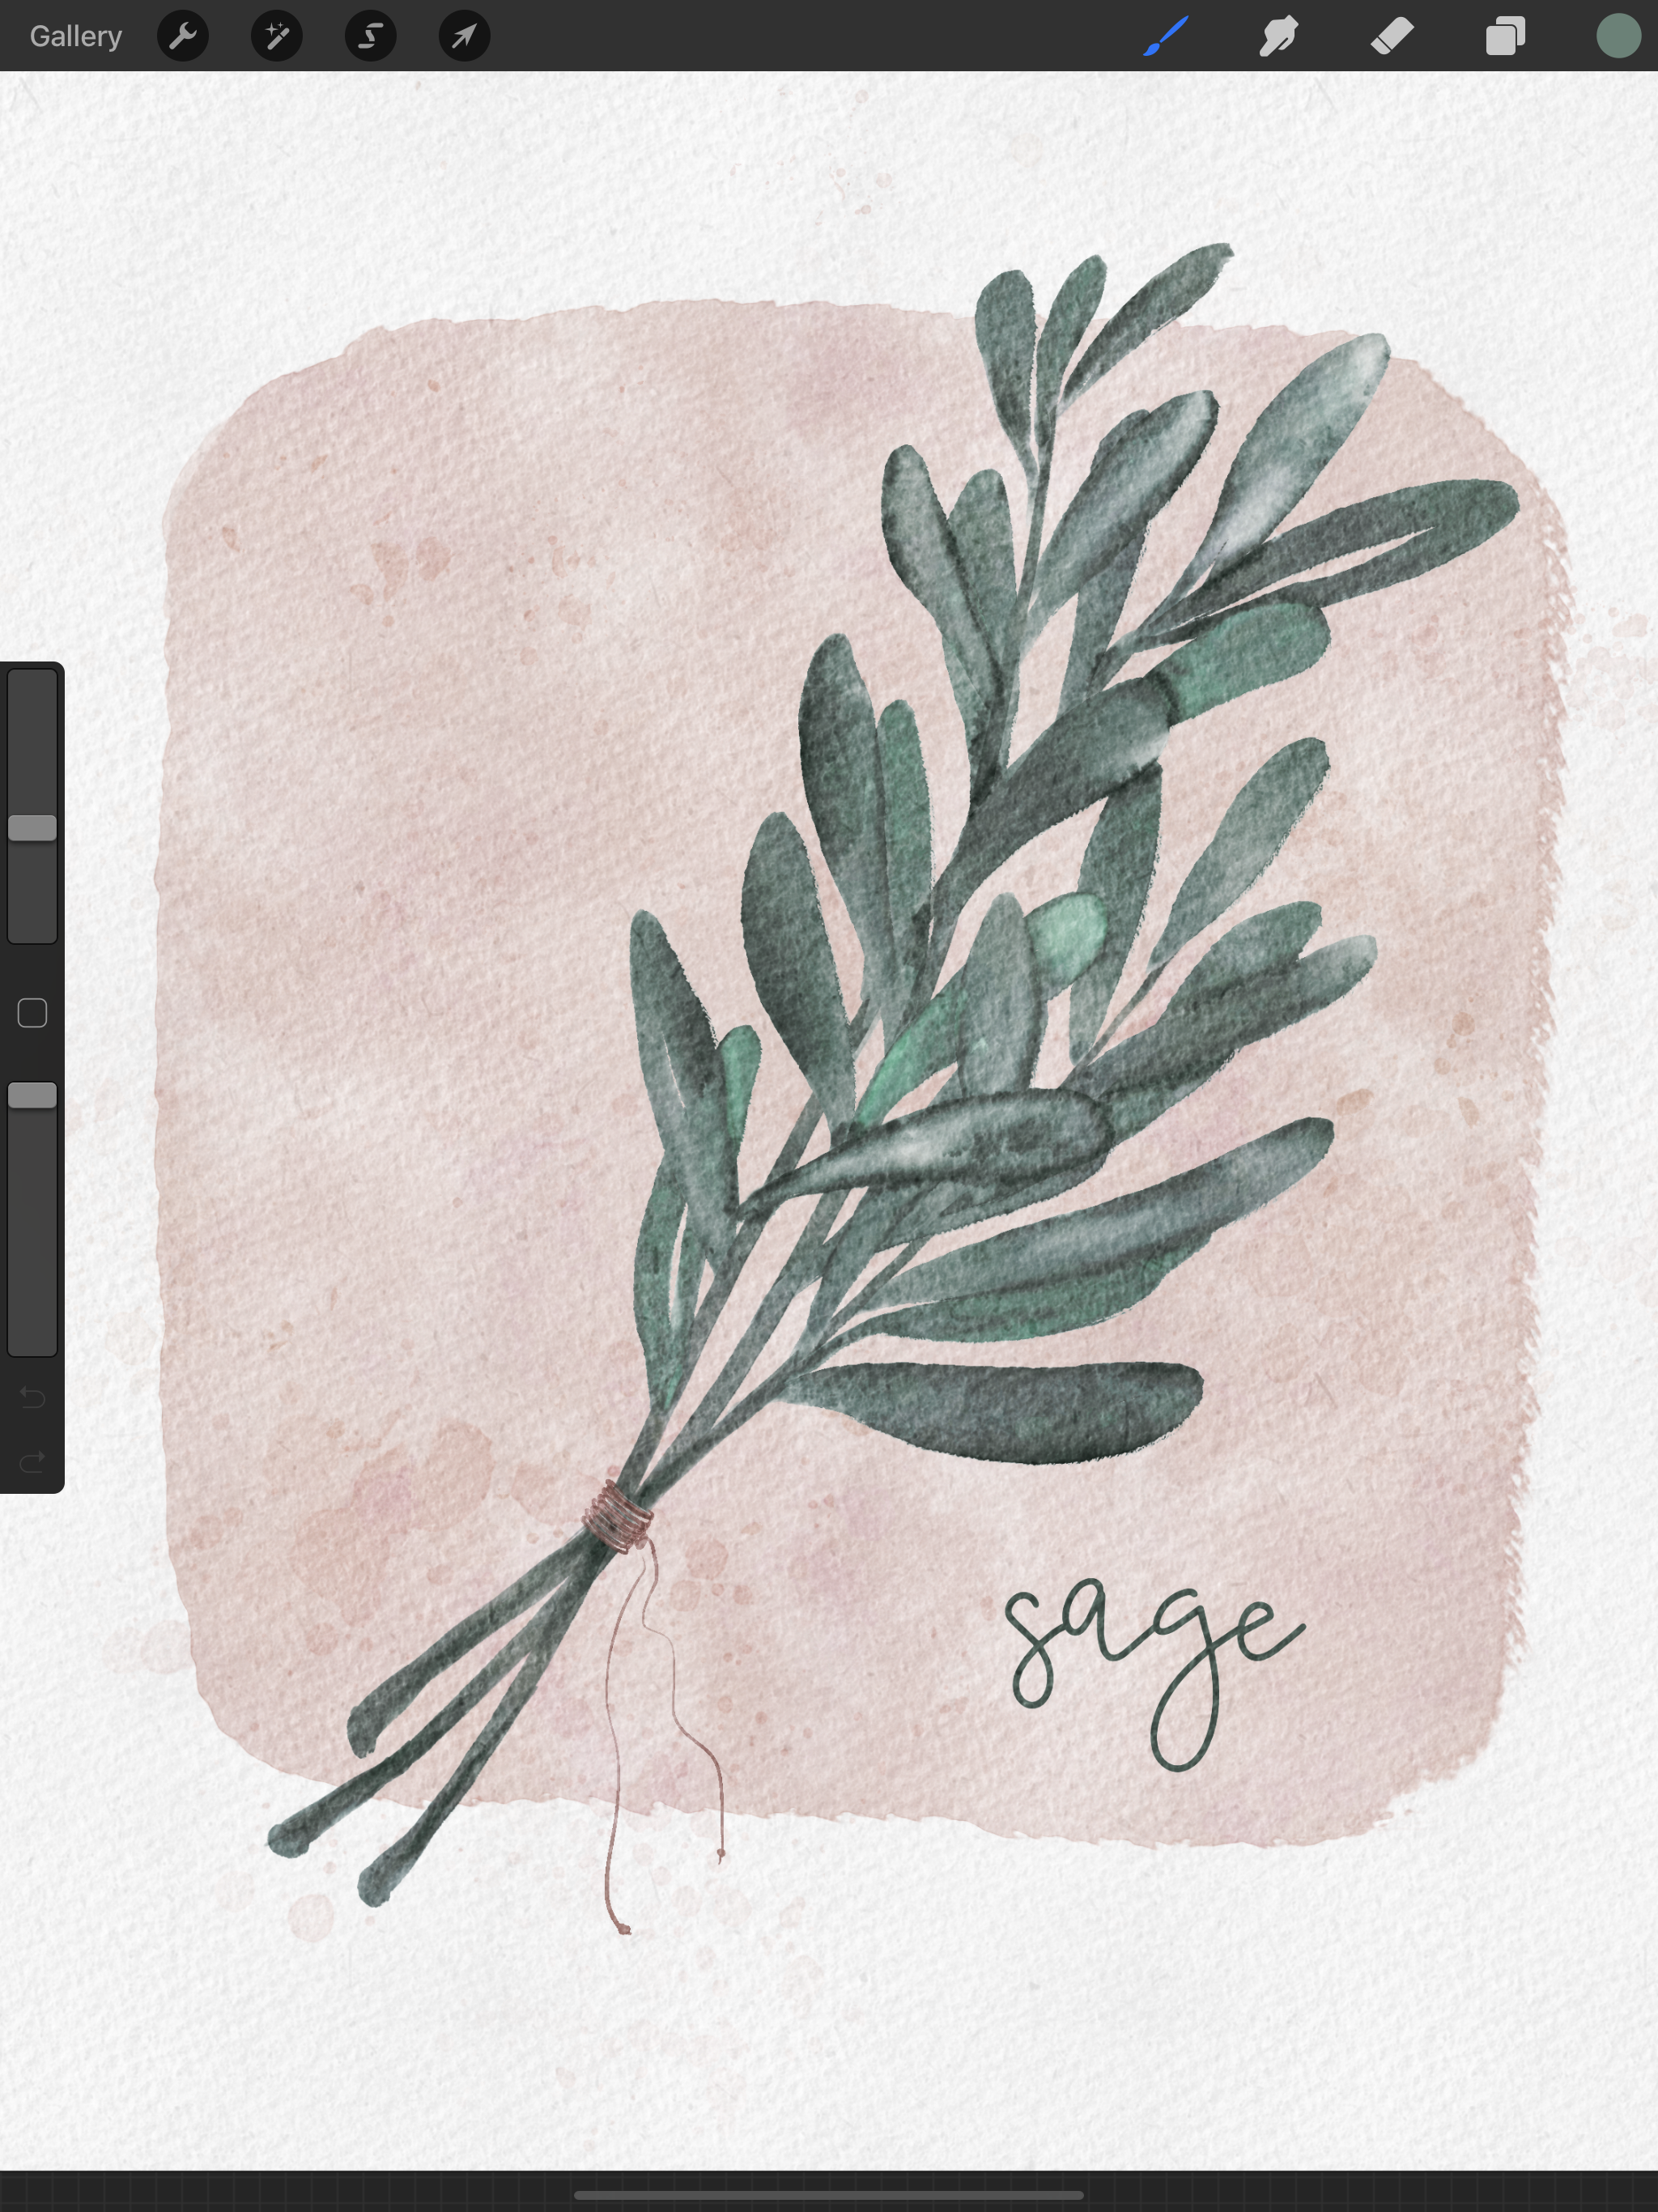
Label
Now you can add the label - either using text, or hand lettering! If you’re using text, access the “add text” option via the wrench in the upper left corner.
Start painting now, or pin this for later!

Get the color palette for this tutorial!

JOIN THE PACK
When you join, you'll gain access to dozens of Procreate freebies: brushes, paper textures, workbooks, and color palettes. I send out weekly updates with my best tips and tricks, and you'll be the first to hear when new freebies are released!