What is Snapping in Procreate?
‘Snapping’ is one of Procreate’s alignment tools, used when transforming an object. It allows you to easily align the object to points within your canvas, whether centering, or bringing something to an edge. Access it in the bottom toolbar when you’ve entered Transform mode in the app. Read on for more details about this feature!
Procreate 5X Update
Procreate 5X has been released, and with it, some lovely snapping tools!
I recently posted a tutorial on creating patterns within Procreate, utilizing functionality within the transform tool that no longer exists within the 5X update. But the good news is, you can still create super precise selections - and now you can even transform objects by entering in the exact pixel size!
transform settings for absolute precision:

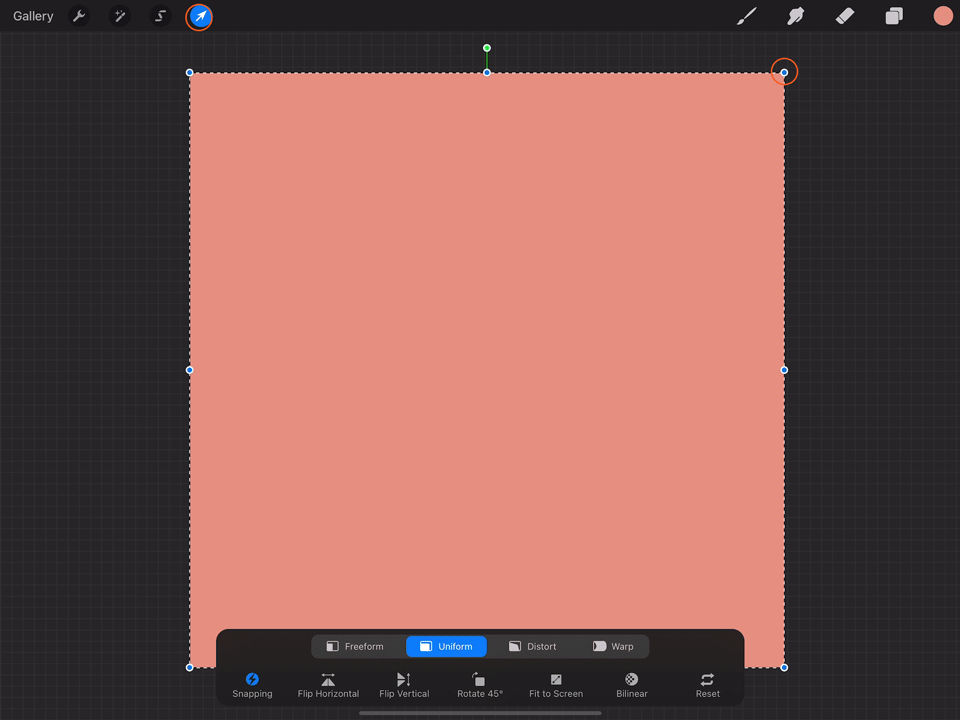
When you tap the transform tool to resize, instead of turning Magnetics on, you’ll instead tap the “snapping” button.
In the menu that pops up, make sure that Magnetics and Snapping are both turned on. Slide the Distance and Velocity settings to Max.
Distance indicates how far from a guide your object can be before it snaps to the guide - so setting it at Max will help guide your object into place. Velocity controls how freely the object can be moved around the canvas; setting it at Max will mean that it catches on more guides on the canvas.

From here, you can resize by dragging the blue corner nodes. Instead of releasing when the “scaled to 50%” message appears, let it snap to the center alignment guides, and check that the width and height measurements are correctly indicating that you’ve resized it to 50%.
Speaking of those width and height measurements - here’s another option for scaling precisely with the new Transform tool and functionality:
Tap on the the blue corner node, and you’ll see a numeric keypad appear. To scale proportionately, keep the chain link turned on (indicated by the blue color). Then, simply type the pixel amount that you’d like to reduce the scale to. In the example, we have a 1000 pixel canvas, so to scale to 50%, we’ll enter 500 pixels.
Then wait just a moment for the object to resize. It will scale in the direction of the corner that you originally tapped. Once it is resized, you’ll need to take precaution to avoid nudging or moving the object any further. This is where I found myself most prone to making mistakes and misaligning the object.
To avoid moving anything, you’ll need to first close the Dimensions keypad, and then release the object. The Dimensions keypad will close if you tap the empty space in the bottom toolbar, or if you tap the paintbrush, smudge tool, eraser, or selection tool.
Unfortunately, you can’t close the keypad by tapping in the space outside your canvas - this will cause your object to move incrementally in the direction that you tapped (using Procreate’s Nudge feature). You also cannot close the Dimensions keypad by tapping the Layers panel, or the Transform tool. So stick to the empty space on the menu, or one of the above tools that will close it.
Once the dimension menu is closed, you can release the object (and thereby prevent any further movement or scaling) by tapping the Transform tool, or by opening the Layers panel.
You can then proceed to save each selection, and continue on with your pattern creation!
Join the Pronto Pack for Free Procreate Brushes

JOIN THE PACK
When you join, you'll gain access to dozens of Procreate freebies: brushes, paper textures, workbooks, and color palettes. I send out weekly updates with my best tips and tricks, and you'll be the first to hear when new freebies are released!