How To Create Seamless Pattern Repeats in Procreate
Want to draw and design patterns entirely within Procreate, without app-hopping, or without exporting your art to Photoshop or Illustrator? I’ve figured out a way to do this that gives you totally seamless results with just a few simple steps. You can totally handle this, I promise!
Because Procreate is primarily a drawing program, it lacks some of the tools you would typically want when creating patterns - for example, alignment tools! However, by using a few clever tricks, we’re going to be able to create repeating patterns that are perfectly aligned, without the need to estimate placement or nudge layers into place. Let’s jump right in!
Procreate 5X Update
Procreate 5X has been released, and with it, some lovely snapping tools! Here’s what you need to know:

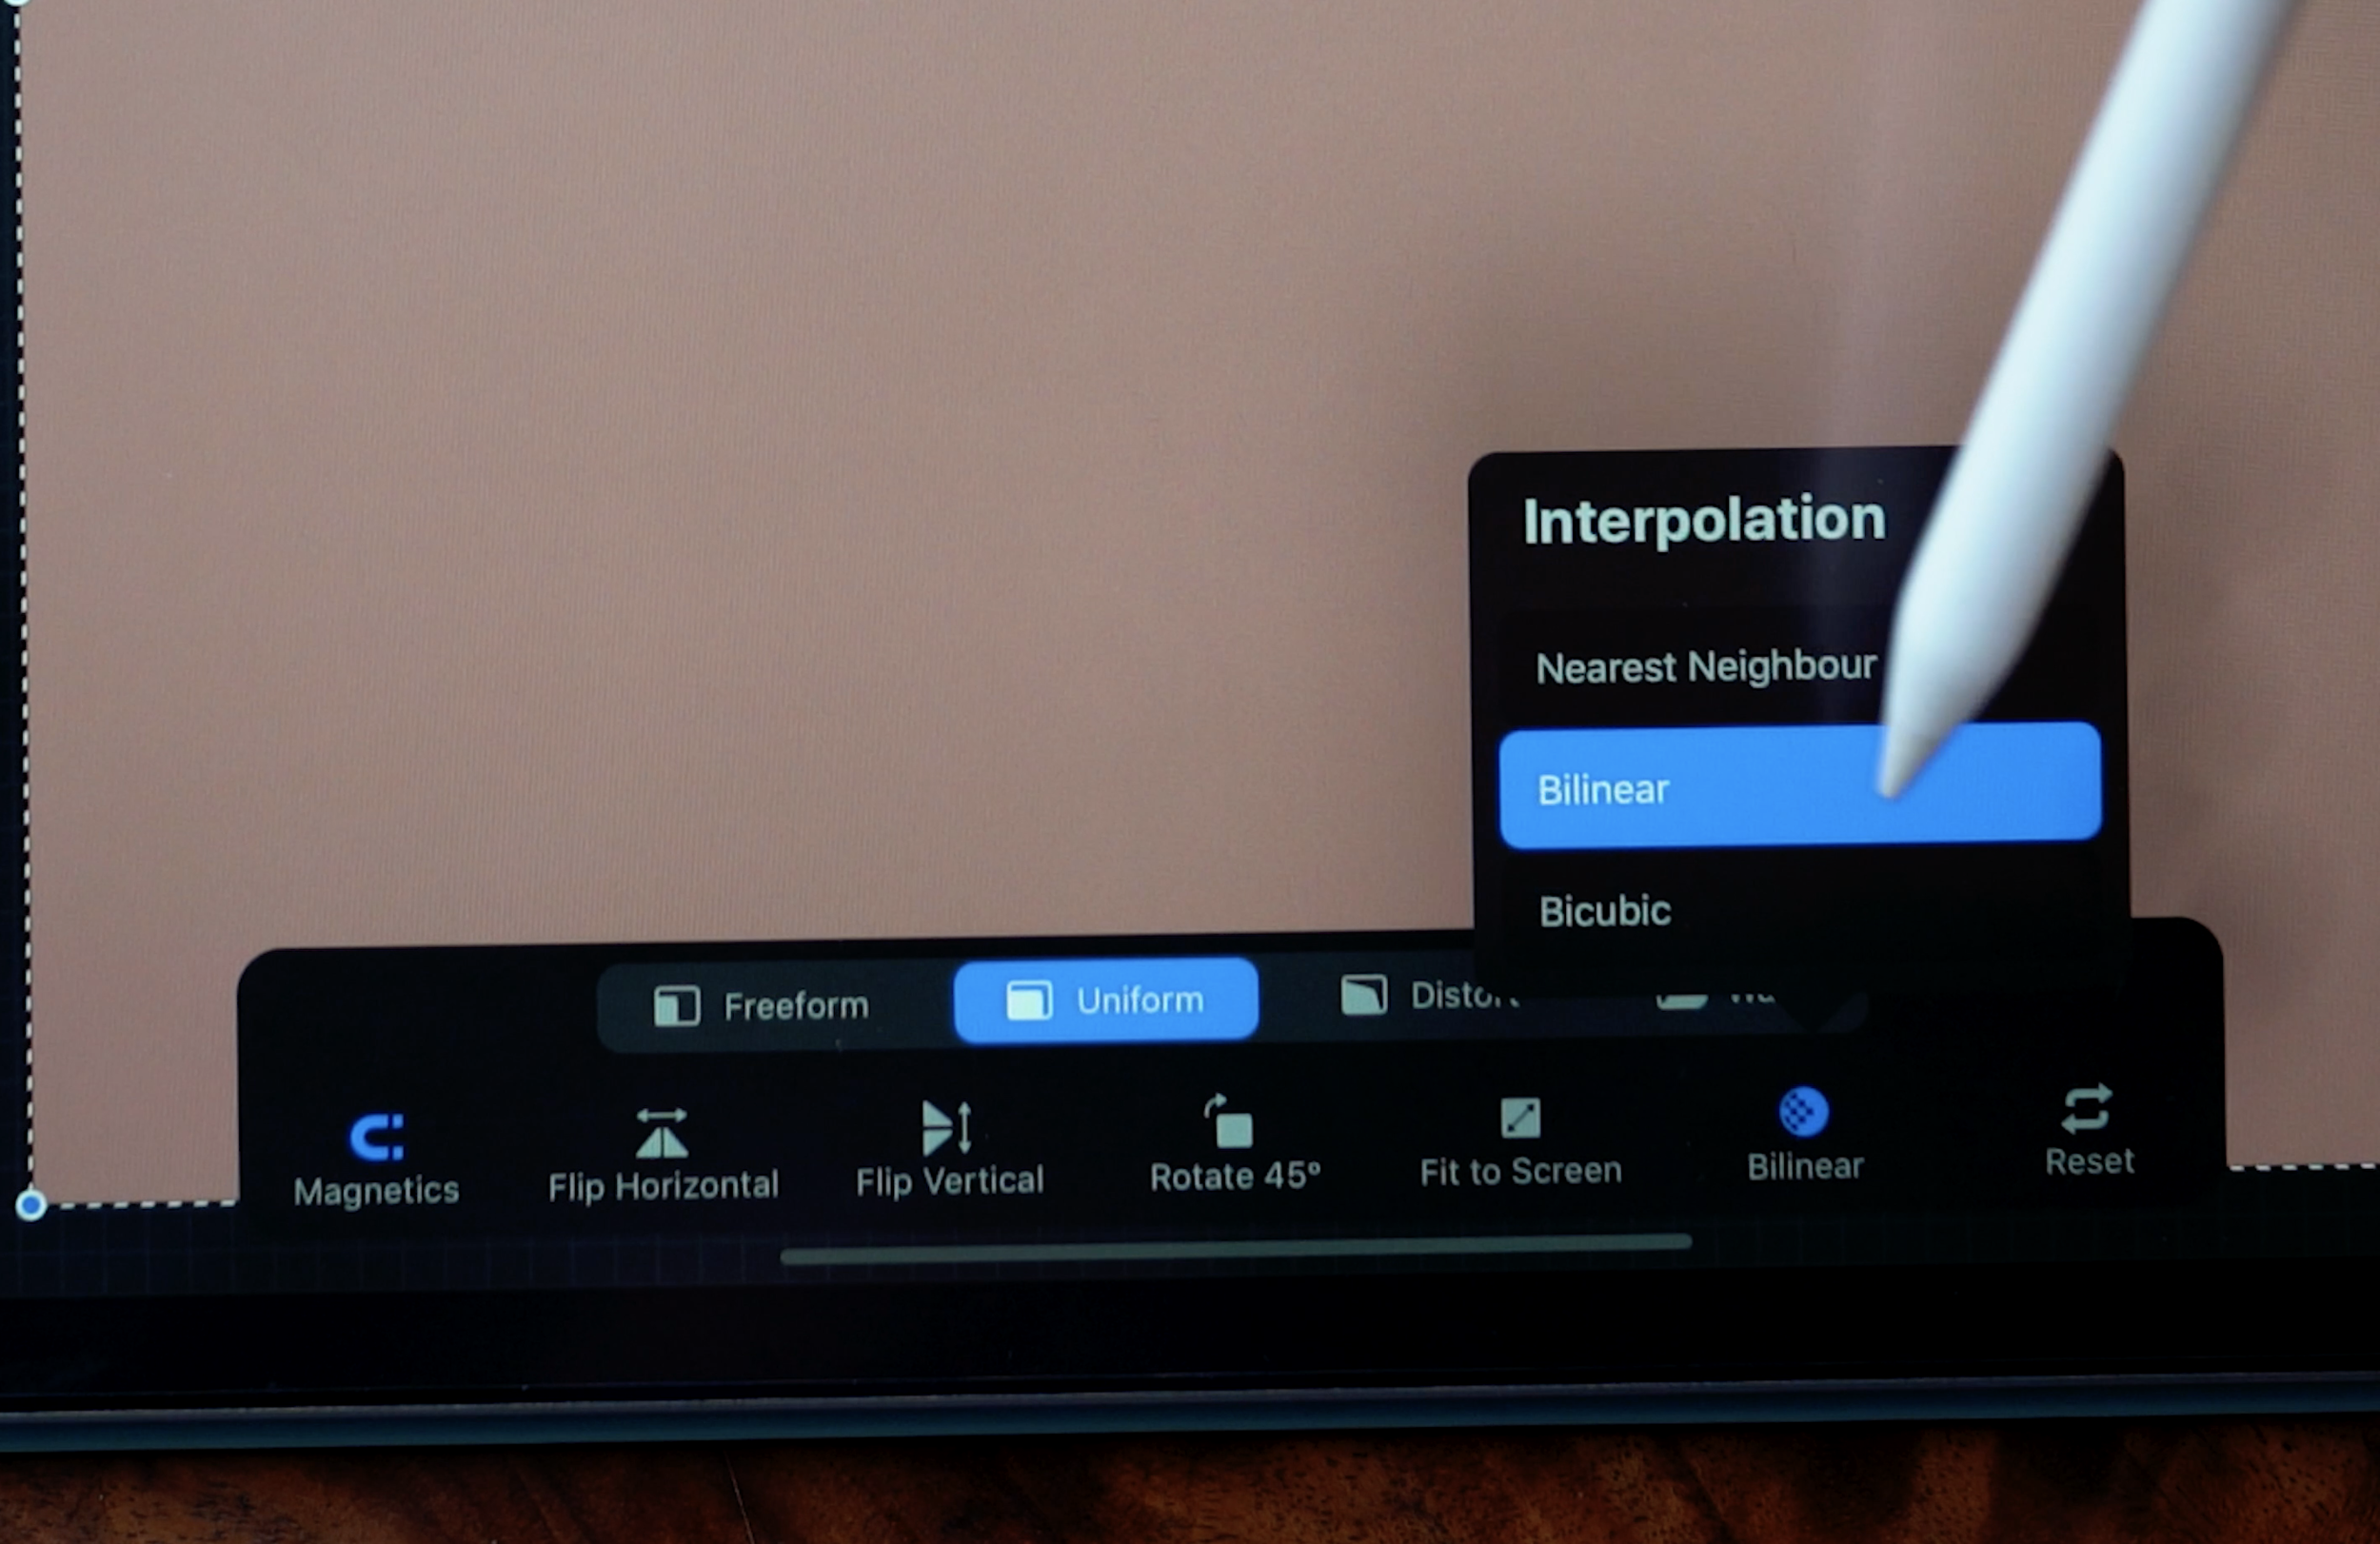
When you tap the transform tool to resize, instead of turning Magnetics on, you’ll instead tap the “snapping” button.
In the menu that pops up, make sure that Magnetics and Snapping are both turned on. Slide the Distance and Velocity settings to Max.
Distance indicates how far from a guide your object can be before it snaps to the guide - so setting it at Max will help guide your object into place. Velocity controls how freely the object can be moved around the canvas; setting it at Max will mean that it catches on more guides on the canvas.

From here, you can resize by dragging the blue corner nodes. Instead of releasing when the “scaled to 50%” message appears, let it snap to the center alignment guides, and check that the width and height measurements are correctly indicating that you’ve resized it to 50%.
Speaking of those width and height measurements - here’s another option for scaling precisely with the new Transform tool and functionality:
Tap on the the blue corner node, and you’ll see a numeric keypad appear. To scale proportionately, keep the chain link turned on (indicated by the blue color). Then, simply type the pixel amount that you’d like to reduce the scale to. In the example, we have a 1000 pixel canvas, so to scale to 50%, we’ll enter 500 pixels.
Then wait just a moment for the object to resize. It will scale in the direction of the corner that you originally tapped. Once it is resized, you’ll need to take precaution to avoid nudging or moving the object any further. This is where I found myself most prone to making mistakes and misaligning the object.
To avoid moving anything, you’ll need to first close the Dimensions keypad, and then release the object. The Dimensions keypad will close if you tap the empty space in the bottom toolbar, or if you tap the paintbrush, smudge tool, eraser, or selection tool.
Unfortunately, you can’t close the keypad by tapping in the space outside your canvas - this will cause your object to move incrementally in the direction that you tapped (using Procreate’s Nudge feature). You also cannot close the Dimensions keypad by tapping the Layers panel, or the Transform tool. So stick to the empty space on the menu, or one of the above tools that will close it.
Once the dimension menu is closed, you can release the object (and thereby prevent any further movement or scaling) by tapping the Transform tool, or by opening the Layers panel.
You can then proceed to save each selection, and continue on with your pattern creation!
Canvas:
You can use any size canvas for this - square or rectangle. For the example, I’m just using the first square option when you go to create a canvas, so it’s 2048x2048 pixels. You can create a canvas at higher resolutions, though, depending on what you’re using the canvas for!
To start, you’ll just need a single, empty layer.

Setting saved selections
First, we’ll need to save four selections: one for each quadrant of the canvas. This will allow us to create the repeat later on.
Use color drop to fill the entire layer with any color.
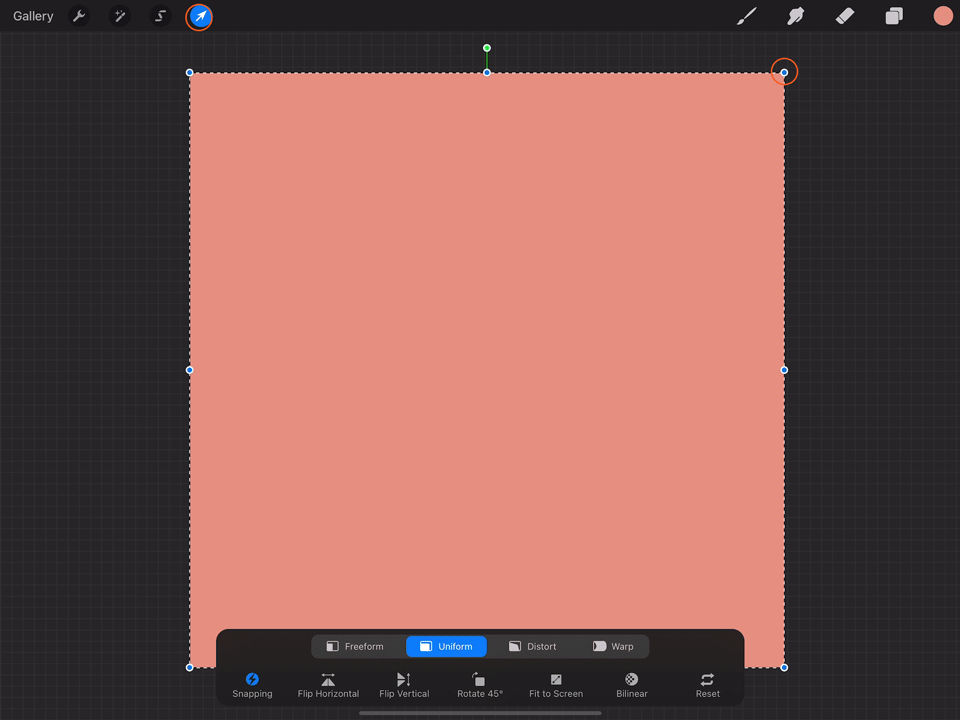
When the layer is completely filled with color, tap the transform tool (the arrow icon in the upper left).

Transform settings
**Procreate 5X settings have changed - check the updated steps at the top of this post**
In the bottom Transform toolbar that pops up, make sure that it is set to Uniform, and that Magnetics are turned on. You’ll also want to check that the interpolation is set to Bilinear.
This essentially dictates how the pixels will render as you move and scale them. Setting it to Bilinear will ensure the least distortion.
Resize to 50%
Grab one of the corner nodes - starting with the lower right corner. Drag inward toward the center, reducing the scale until the square snaps to 50% scale.


The “Snap to 50%” message will show at the top of the screen. (The message is enlarged in this image - it will appear smaller on your screen.) Release the square by tapping the transform tool.
This is how you’ll be able to ensure an absolutely crisp quadrant, which will ensure your repeats will be totally seamless.
Now, go into the Layers panel, and select the layer contents. You can do this by tapping on the layer to bring up the side menu, and choosing select from the menu; or, you can use two fingers to press and hold on the layer until the selection appears.

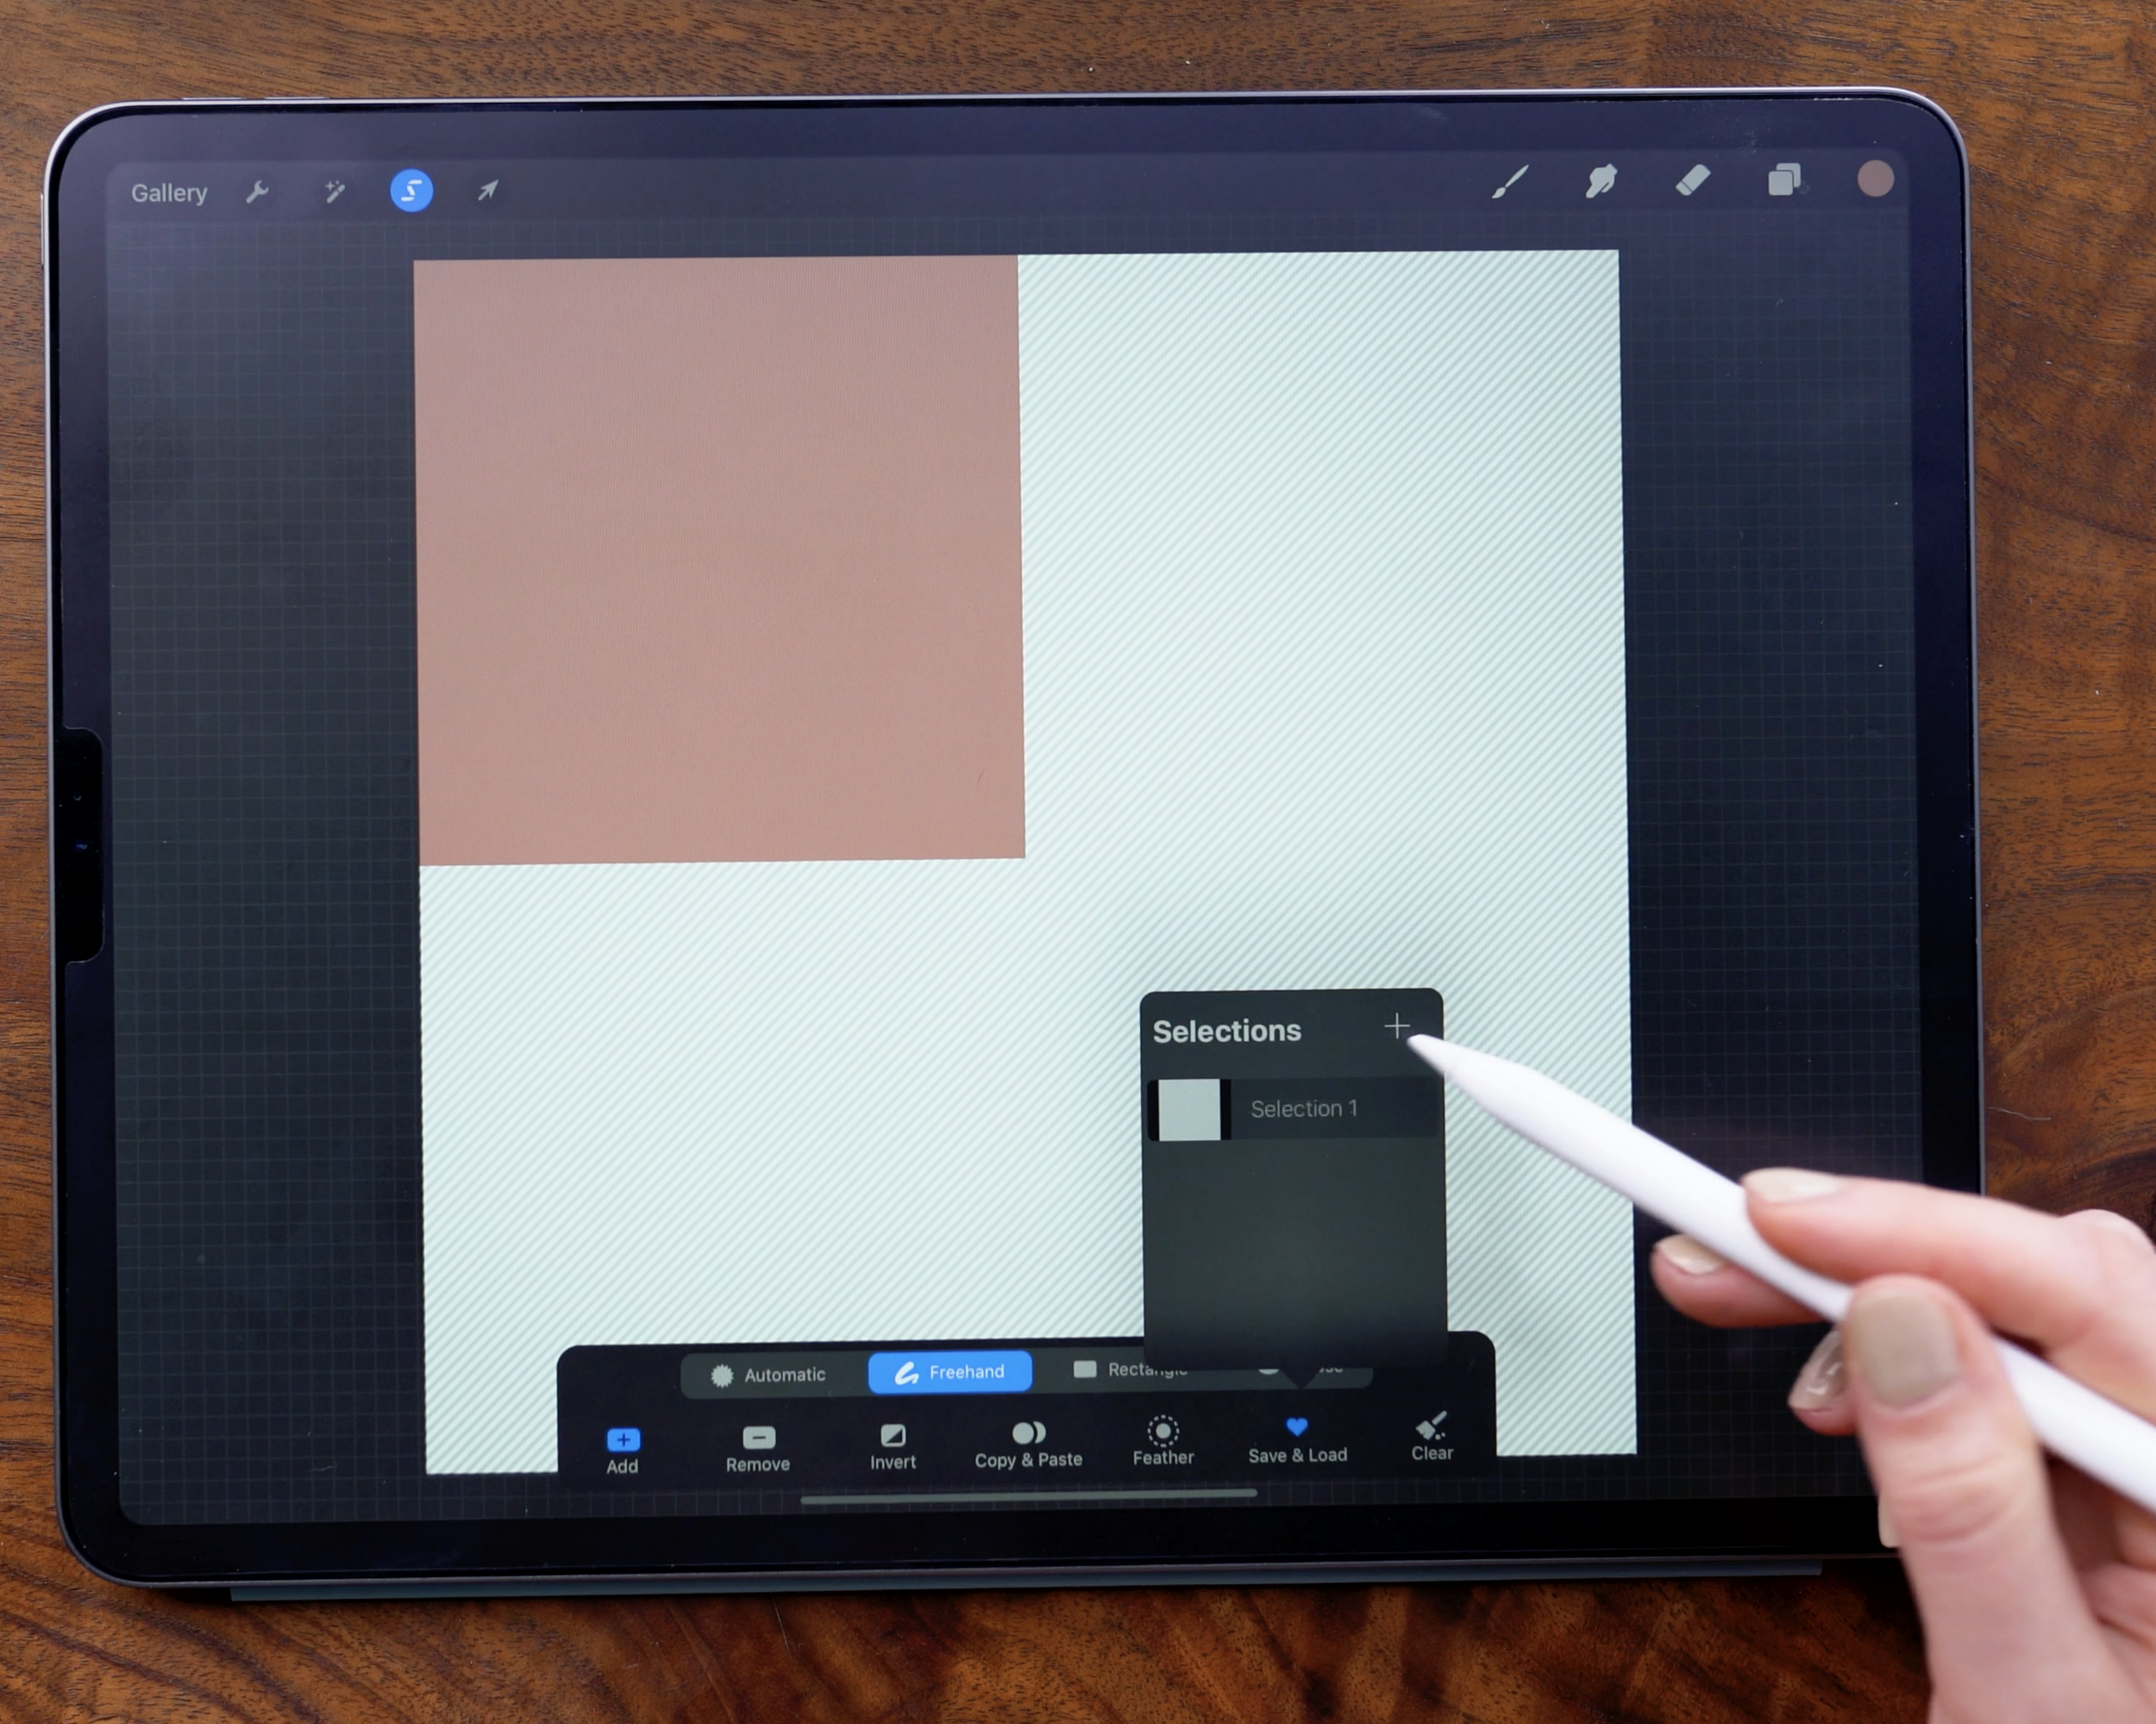
Once the lower selection toolbar appears, tap Save & Load, and then tap the plus sign to save this as Selection 1.
Then, tap the selection tool to exit. Now, repeat for the remaining quadrants, until you have four saved selections - one for each quadrant of the canvas.
Creating the pattern: Layer Group
You can clear the layer after your selections are saved, and move on to creating the pattern.
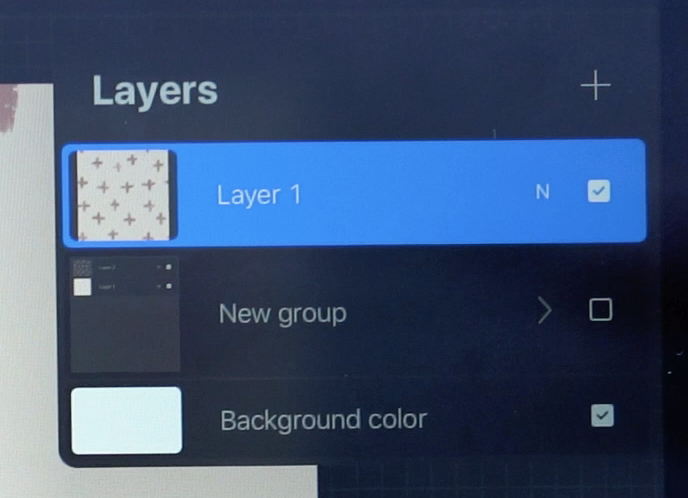
In the layers panel, add two empty layers, and then select both layers and tap “Group”. Working within a group will allow you to easily treat the pattern as a single entity, but also gives you the flexibility of adding your pattern elements on different layers - meaning you can preserve blend modes and clipping masks as you create your repeat.


Use color drop to fill the bottom layer with your background color of choice.
You can change or remove this later on, but it’s necessary to have a background that fills the entire canvas when using our saved selections later on. If you skip this step, your pattern may end up with seams or breaks.
Adding Pattern Elements
Move to the layer above, and begin to draw in your pattern. In the example, I’m just drawing simple plus signs, but you can create any level of complexity you like!
Just be sure to avoid drawing over the canvas edges. We will fill in the extra space later - for now, stick to the bounds of the canvas.


Once you’ve drawn the initial pattern elements, it’s time to flip the quadrants to actually create the repeat.
In the layers panel, collapse the layer group, and then keep it selected (indicated by the blue highlight).
Tap the selection tool. Then, in the bottom bar, tap Save & Load. Choose Selection 1.


Once your selection is loaded, tap the transform tool.
In the bottom toolbar, tap Flip Horizontal and then Flip Vertical. What this does is rotate the square 180 degrees - so the inside edges of the quadrant become the outside.
Tap the transform tool once more to release the quadrant.
Repeat for the remaining quadrants. Take care not to nudge, move, or scale anything when transforming.
Because you’ve rotated each quadrant upside down when transforming, you may need to use two fingers to pinch and rotate the entire canvas.
Now you should have some elements that cross over the edges of the canvas. This is what creates the seamless repeat! However, we’ll still need to do some re-arranging before this is finished.

Adjusting the pattern
There is likely some odd spacing now that you’ve flipped the pattern. Because you’ve kept all your layers intact within the layer group, you can go back into them to make any changes.

Use freehand select to draw a marquee around elements that you want to re-arrange, and then tap the transform tool to move them.
You can also add in additional elements if you think the pattern needs it.
Spacing the elements out might take multiple tries - and that’s okay! Just eyeball it, use your best guess, and know that you can always re-adjust later.
If you’re using multiple layers with clipping masks, be sure to select all the layers that are used within an element before transforming and rearranging that element.

testing the repeat
Once you are happy with the spacing and overall arrangement of the elements, it’s time to test how the pattern looks as a repeat. To do this, go into the layers panel, and collapse the layer group.

Swipe to the left on the group to duplicate it.
This will double the amount of layers in the document, so if your pattern is maxing out layer capacity and you don’t have the space to do this, you can instead make a copy of the document in your gallery, and work in the copied document to test the repeat. Proceed from the step below to flatten the layer group.
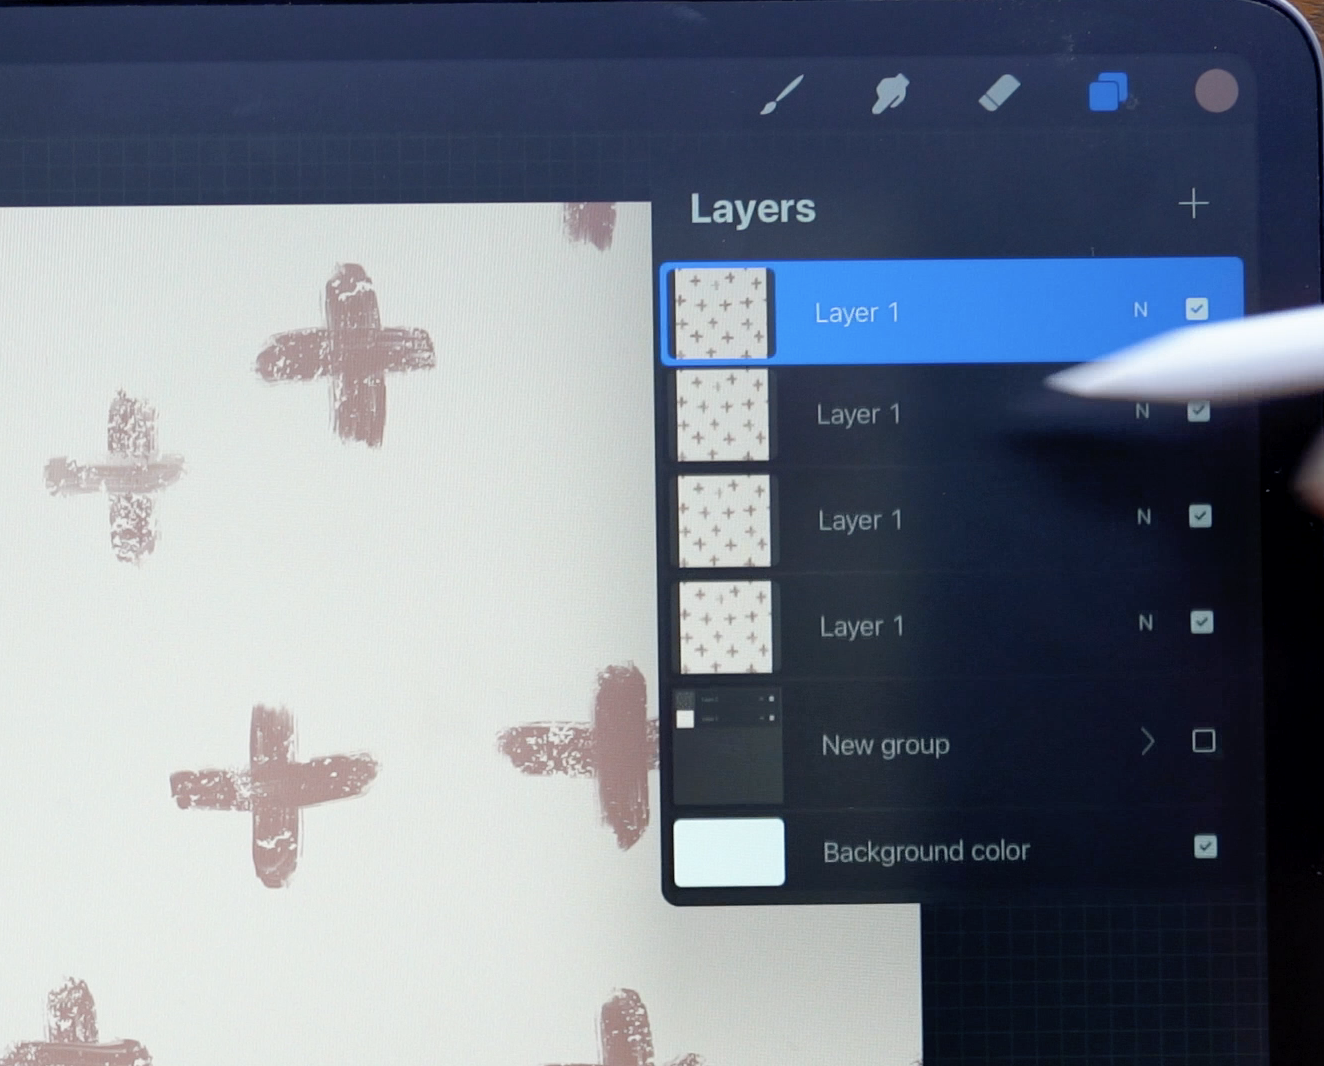
Tap the duplicate to bring up the side menu, and then choose flatten. You will now have a single layer with the repeat above your original layer group. Uncheck the group to hide visibility for now. Duplicate the flattened layer until you have four of them.

Next, we’re going to resize each of these layers, similarly to how we did when we were setting up the selections. On the top layer, tap the transform tool, and then drag from the lower right corner node inward, until the layer snaps to 50% scale.
Tap the transform tool to release the layer, and then open the layers panel and move down to the next layer. Scale each of the four layers into all four quadrants, snapping to 50% scale each time.


Now you can more clearly see what the repeat looks like! You can merge these four layers together, duplicate them four times, and repeat the process again if you want to continue to scale the repeat.
If you need to make adjustments, simply hide the test layers, go back into your layer group, and arrange as necessary. You can also re-flip the quadrants back to the original orientation if want to make changes to any elements that cross the canvas edges.
Here are some examples of more complex patterns I’ve created using this method, to give you an idea of what you can do!
I hope you enjoy making all the lovely patterns! Definitely tag me on Instagram if you post your results there - I’d love to see!
Start painting now, or pin this for later!

Get the color palette for this tutorial!

JOIN THE PACK
When you join, you'll gain access to dozens of Procreate freebies: brushes, paper textures, workbooks, and color palettes. I send out weekly updates with my best tips and tricks, and you'll be the first to hear when new freebies are released!